
I know a lot of people who work in tech but not as software engineers. They often ask me the question “how do I code?” This isn’t the kind of question you can with a yes or a no or in a single paragraph. Instead, I have to answer this question by pointing to books or online resources that promise to teach coding. I also have to point out which kinds of things aren’t coding (e.g. online interfaces, HTML, and SQL are not programming languages in the conventional imperative sense). But when I give an answer like this, it’s not really my answer: it’s someone else’s answer that I’m just packaging and reselling. In this blog post I’m going to give my answer to the question how do I code? – this is an answer that I personally find satisfying (and so will you!). This will be a long post, equivalent to a meaty textbook chapter or even a short monograph. In it I’ll first explain what programming means using very abstract language, then I’ll show you the environment that programmers work in. Lastly I’ll show you the core logical concepts that constitute programming.
What is Programming?
There’s a very abstract definition of a programming language that goes like this: programming languages are formal languages which define a set of instructions that produces some kind of output. The problem with a definition like this is that you’re forced to define formal language, set of instructions, and output – which can all be tricky and have equally abstract, annoying definitions that might lead you down a frustrating Wikipedia rabbit hole. Instead I think it’s useful to provide a less rigorous definition, give some examples, and refine our definition over time until, eventually, the meanings of all these concepts start to make intuitive sense. You learn to drive a car by driving it, not by reading a textbook about how to drive cars.
Here’s an example of some Python code:
hospital_patients = ["Bill", "Jared", "Billy"]
if "Jared" in hospital_patients:
    print("Jared is sick :(")
What’s happening here is that some data is being defined (a list called hospital_patients), a logical operation is being performed on it (is Jared in that list?), and some output is being produced (print the answer to your computer screen). It doesn’t matter if you don’t understand anything that’s written in the code block above, because each of these concepts will be defined in the following sections.
When I teach you about Python, we’ll explore various kinds of data and the different kinds of logic you can apply to it and the outputs you should expect: want to search a gigantic database to see whether your ex-boyfriend is in it? Want to automatically generate a story? Want to make a graph database of friends (Facebook)? Programming can do all these things once you’ve defined the data and logic in certain, very-specific ways.
The snippet of code above is called a program. If you wanted to, you could write that program on a whiteboard and go through its logic and nod your head at the output. However, a program written on a whiteboard isn’t very useful. Ideally, you want a program to be executed on a computer. In order to do this, it helps to be familiar with the environment that programmers usually work in. This often includes a text editor, files saved in a directory, and (most importantly) a terminal. The terminal is a program that lives on your computer and lets you access files and search around. Most importantly, it also lets you execute code. In the following section I’ll get you familiarized with how to use the zsh terminal on MacOS. This might seem like a detour from the goal of learning how to code, and technically it is, but like a person who wants to learn sailing, it helps to know how to swim first – so in the next section I’ll teach you how to use zsh so you don’t drown.
The Terminal
You might have encountered your computer’s terminal in the past. This is a box that imitates what all computers looked like before Graphical User Interfaces (GUI’s) became commonplace in the mid 1990’s. The terminal is only that: a box, and is a type of Command Line Interface (CLI). But inside the terminal a programmer can type commands that lets them navigate around their computer, create new folders and files, search for things, and run programs.
The tool that you use to execute these commands is called the Z Shell (zsh) and is installed by default on all versions of MacOS starting with Catalina: if you’re using an older version of MacOS, make sure to upgrade! Zsh is not a programming language per se, but is a command language that lets you access and control your computer. Before you learn how to program, you should learn the basics of this simpler kind of language.
The Command Prompt
Open the Terminal app. You’ll see a small box appear with your username followed by a dollar-sign, something like this: cameron@cameronsmacbook $. This text is called the command prompt, and usually contains some useful information, such as the name of the user. Any commands you type will appear after the prompt. The next few sections will introduce practical terminal commands. As we learn these commands, we’ll also be taking a look at how MacOS works under the hood.
Listing Files
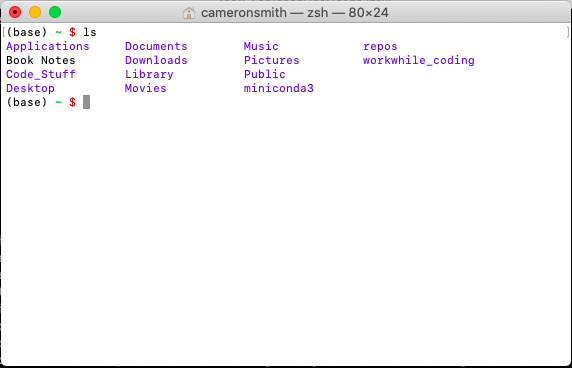
The first zsh command I’m going to teach you is very simple. Type ls in your terminal and press the enter key. ls is short for list and shows all the files and folders in your current directory. When you open the terminal, it by default starts at your computer’s home directory, so you should see things like your Movies, Documents and other folders, along with any files that might be floating around. Here’s what that should look like:
If you want to open your home directory using your computer’s GUI, simply type open . (remember to include the period!) and Finder will pop open.
Navigating Around
I just mentioned that ls shows all the files and folders in the current directory. But how do you know what directory you’re in anyway? To find out, type pwd (print working directory). Something like /Users/cameron should appear – this is your home directory. If you want to list all the files in your Documents folder, you can type ls Documents. Technically, what’s happening here is that ls is a function that takes either zero or one argument – if no argument is provided (meaning you just type ls – arguments are the things that come after the command) then the function lists everything in the current directory. If a directory name is provided, then it lists everything in that folder.
But what if there are some more folders inside your Documents folder, folders like Books and Secret_Docs and you want to explore their contents? You have two options: one is to list everything inside Documents, check what’s there, and then list everything inside the sub-folder you care about, like ls Documents/Books; notice the slash between Documents and Books – a / means that Books is inside of Documents. Another option is to change your working directory to Documents and then ls everything inside of it: the command to do that is cd Documents (change directory). Once you cd inside of Documents you can simply type ls to see everything inside of it or ls Books to see everything inside of Books.
Parents and Children
Remember when I showed you the open . command in the Listing Files section? That period might have seemed out of place, but it’s actually an argument to the open function: . means “current directory,” and instead of doing open . you could also type open Documents/Books or whatever. You can see the children (also called the sub-directories) of your current directory by typing ls (or ls .) but how do you see a directory’s parent directory? Do do that, type ls .., where the two periods mean “parent of this current directory”. You can also navigate to the parent directory by typing cd ... Try it out: cd to your Documents folder, ls it to check the contents, cd .. to get back to your home directory, and then pwd to make sure you’re in the right place. If you want to go to the parent of your parent directory, it’s just cd ../...
The File System
You’ve not seen how to list files, show the current directory, navigate around, and use some of the special symbols for current directory (.) and parent directory (..). These commands and symbols suggest that the files and folders on your computer are organized into some kind of structure. Now, it’s entirely possible for a computer not to have a file system: the files can just be spread out into some long, flat list. But this isn’t how the creators of Unix (the predecessor of MacOS) decided to design things. Instead, they decided to organize the files into a hierarchical structure that looks like a tree: the branches on this structure are folders, and the leaves are the files. Folders are simply containers that contain files or other folders. Here’s what the file system on my computer looks like (the three dots mean “etc” – there can be more files or folders):
/
    Applications
    Users
        Cameron
            Desktop
                my_secret_file.txt
                businessInfo.xlsx
                ...
            Downloads
                TrojanVirus.lol
                family_pics
                    ...
                ...
            Pictures
                cutedog.png
                thirstTrap.gif
                ...
            ...
    Volumes
    tmp
    ...
Some of these folders contain special files, like Volumes where any USB sticks plugged into your computer live, and /tmp which is a folder that deletes all its contents every time your computer restarts. Another important folder is Applications where many of your apps will be installed: cd to your Applications folder and see what’s inside. If you want to learn more about how your computer is organized, you can cd to the root directory (cd /) and then explore with the normal ls, pwd and cd commands. If you want to return to your home directory, there’s a special shortcut: cd ~. So no matter where you are in your filesystem, cd ~ will always bring you home, and cd ~/Desktop will always bring you to your Desktop folder, etc.
Creating, Exploring, and Deleting Files
Now that you know how to explore your computer’s filesystem, you probably want to make changes to it. In order to create an empty file, type touch myfile where myfile is any name you want, like notes or mySecrets and it can have an extension of your choice like secrets.txt or taxes.lol. You can create a file with or without an extension, but be warned that other programs interpret these extensions in various ways. For instance, try creating a file ending in .txt. Then open this file with the TextEdit program by typing open myFile.txt. Once the file is open, enter some text into it, like “Here’s my file” and press command+s to save the file.
If you want to see what’s inside the file you’ve created, you can always use the open command to open it in a text editor. However, it’s often quicker and easier to do this on the terminal: cat myFile.txt (“con-cat-enate”) prints the contents of the file to the terminal.
If you want to delete the file you’ve just created, type rm myFile.txt and it’s gone forever. Warning: When you delete something from the terminal, it’s gone forever. It isn’t sent to the Trash bin or stored somewhere else, it’s wiped from your computer. So be careful!
Creating and Deleting Folders
We already know how to inspect and navigate around folders, so let’s create them. mkdir school_pics creates a new folder called school_pics. Try creating this folder somewhere, navigating inside it, creating some dummy files, listing them, and then printing the current directory. If you’re also to do all that, you’re on the right track.
Now let’s clean up by deleting everything we’ve just done. One method of doing this is to navigate into school_pics and type rm <filename> for every file in that directory. An easier way is to delete the entire folder: rm -r school_pics. If you don’t add the special -r symbol (which is called a flag) then you’ll get this error: rm: school_pics: is a directory. This is your computer helpfully reminding you that this is a directory and might have things you care about inside of it. The -r flag stands for “recursive” and means you intend to recursively delete everything inside this folder and the folder itself. Remember, just like when you delete files, when you delete folders they’re gone forever!
Moving and Copying Things
Before I continue with showing you more commands, I’m going to introduce a little bit of syntax to help our understanding. When I have a command like ls <folder> I’m going to use the angle brackets to represent some variable: in this case, <folder> means some arbitrary folder. touch <filename> means you can create a file with the arbitrary name <filename>. The names for the angle bracketed variables that come after a function name are arguments: we’ve seen functions that take zero arguments like pwd, zero or one argument like ls .., and one mandatory argument like touch newFile.
When you want to move something from a source to a destination, you’ll use a function that takes two arguments: mv <source> <destination>. In the following example, the source is a file and the destination is the Documents folder: mv my_notes.txt ~/Documents. You can also move folders around: mv myFolder ../tmp_files. If you move one file to another file, this has the effect of renaming the file: mv file1 file1.txt.
You can also copy things: cp my_notes.txt ~/Desktop. If you want to copy a folder and all of its contents, you’ll have to use the recursive flag again: cp -r my_pics ~/Pictures.
Now you should know how to do a lot of important basics: navigate, create things, rename them, copy them. In the next few sections I’ll focus on how to search for things.
More Ways to Look at Files
In Creating, exploring, and deleting files we learned how to use cat to print the contents of a file. But when the file is really big, like a novel, we don’t want to print everything to the screen. Instead we can use head to print the first ten lines of a file. First download this text file to your computer: https://raw.githubusercontent.com/camoverride/get_into_tech/master/chapter_1/invisible_cities.txt (you can simply follow the link, press command+a to select everything, command+c to copy it, and command+v to paste it into a text file). Save the file somewhere as invisible_cities.txt. Use head invisible_cities.txt to print the first ten lines. If you want to print the last ten lines, type tail invisible_cities.txt.
The head and tail functions accept an optional argument that changes the number of lines that get printed. For example, head -5 <file> will only print the first five lines from the file.
Searching for Files
In the last section we downloaded the contents of a book and saved it to the file invisible_cities.txt. Let’s say that we’ve forgotten where we downloaded this file, but know it’s in our home directory somewhere and we still remember its name. To find its location, first navigate home (cd ~) and then type find . -name invisible_cities.txt. The find program will then search inside the . directory (the current directory) and any folders inside that directory for files names invisible_cities.txt. If it finds this file, it will print it to the screen.
Let’s say that you remember that the name of the file, invisible_cities, but forget its extension. To get around this, you want to search for all files beginning with invisible_cities and ending with whatever. This is where regular expressions come in handy. The regular expression * matches anything, so invisible_cities* will match this filename followed by any file extension. Try it out: find . -name invisible_cities*. You can go the other way too: let’s say you’ve forgotten most of the file name except the cities part: find . -name *cities*.
Regular expressions are important and can be used to create very complicated patterns to match strings of text. The simple regular expression * is all we’ll need for now, but keep in mind that there are many more! You can use regexes with other functions too: rm * will delete all the files in the current folder.
Searching Within Files
In the last section we learned how to search for a file given some information about its name (either the full name or a regex pattern that matches part of the name). But what if we want to look inside a file for a line that contains a particular word or phrase? grep (“general regular expression print”) looks for lines that contain our word or phrase and prints them.
grep takes two arguments: a pattern and a file to search through: grep "<pattern>" <file>. To search for the phrase Kublai Khan in our book, type grep "Kublai Khan" invisible_cities.txt. This is the output that should appear:
Kublai Khan ekes not necessarily believe everything Marco
Kublai Khan remains silent, reflecting. Then he adds:
two beggars nicknamed Kublai Khan and Marco
Now Kublai Khan no longer had to send Marco Polo on
At this point Kublai Khan expects Marco to speak
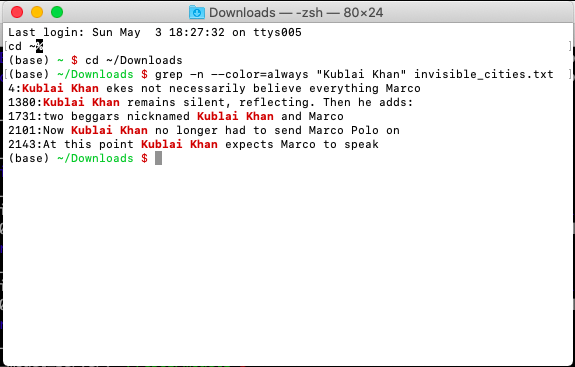
grep has some useful optional arguments. One is -n, which prints the line number along with the line: see what happens when you type grep -n "Kublai Khan" invisible_cities.txt. Another is --color=always, which highlights the matched portion of the line in red: grep -n --color=always "Kublai Khan" invisible_cities.txt.
grep is such an important command that it even gets its own verb: if you’re ever having trouble finding something in your messy bedroom, office, or MacBook, you can search around for it like a normal person, or you can try grepping for it!
Recursively Searching Within Files
Let’s say you want to grep for something, like the word “Emperor” (capitalized), but don’t even know which file it’s in. Let’s say, however, that you know it’s inside of your Documents directory. Instead of specifying just one file to look inside of, grep can be given the -r (recursive) argument and be provided with a directory to search inside of instead of a filename. This directory will be searched recursively, meaning that all the files inside this directory will be searched, along with all the files inside all of its sub-directories, on and on. This can be a slow and dangerous command, especially when used in a directory that contains lots of data.
To search for Emperor, first navigate to the directory where you’ve saved Invisible Cities and type grep -r "Emperor" . This should print the following output:
./Documents/invisible_cities.txt:329:Armenians, Syrians, Copts, Turkomans; the Emperor
But let’s say that you don’t care whether Emperor is capitalised or not. Use another regular expression, this time the capture group [Ee] which matches uppercase E and lowercase e: grep -r "[eE]mperor" . (The order of the letters in the capture group doesn’t matter).
Output Redirection
When we run a command like head invisible_cities.txt the text that gets printed to the terminal is called the standard output.” The standard output is often useful in and of itself – in the sections above, we looked at the standard output to see where phrases like Kublai Khan appeared, what kind of stuff was in a given folder (ls), and what the contents of a file were (cat). But sometimes this isn’t enough. Sometimes we want to actually capture this output and write it to a file. This section is about capturing and redirecting the output of functions.
The command echo "<words>" takes some text and simply prints it back to the standard output. See what happens when you type echo "Hey guys what's up?" (don’t forget the quotes). Having this text printed to the screen isn’t very useful in and of itself: it might be more useful to redirect this to some file. The command echo "Hey guys what's up" > myfile.txt takes Hey guys what’s up and writes it to a new file called myfile.txt. The > symbol means take whatever is to my left and write it to the file to my right. Explore it for yourself: try cat-ing the file and see what’s inside. In fact, you can even cat a file and redirect that output to another file (which is similar to just copying it): cat myfile > newfile.
Here’s another example. invisible_cities.txt is a large file. If we want to share a sample of the book with a friend, it’s probably best to share only a little bit, maybe the first 25 lines. We can print the first 25 lines to the terminal like this: head -25 invisible_cities.txt and then redirect the output to a new file like this head -25 invisible_cities.txt > cities_sample.txt
When you use > to redirect some output to a new file, the existing contents of the file get erased. If instead you want to append the output to the bottom of the file, use >>. If we want to append a little note to the bottom of cities_sample.txt, this is what we would do echo "This is the end of the sample." >> cities_sample.txt
Chaining Together Commands
In the last section we learned that > redirects the standard output to a new file and >> appends the output. The pipe operator, |, takes the output and redirects it to a function, not a file. Let’s say we want to search only the first 2000 lines of Invisible Cities for “Kublai Khan” instead of the entire book. A naive approach to this is writing the first 2000 lines to a new file, and then grepping that: head -2000 invisible_cities.txt > sample.txt followed by grep "Kublai Khan" sample.txt. But we can skip this intermediate step. Instead, just direct the output to grep like this: head -2000 invisible_cities.txt | grep "Kublai Khan".
Here’s another time where | comes to the rescue: let’s say that we want to print lines 25-100 of “Invisible Cities.” We know that head and tail print the beginning and end of a file respectively, and we can use the flag -<num_lines> to change how many lines are printed. See if you can understand how head -100 invisible_cities.txt | tail -75 gives us lines 25-100.
Hidden Files and Aliases
In MacOS and other Unix-like operating systems, any file of folder beginning with a period is hidden from the user. These files are hidden because they’re usually not directly useful to the normal user, and hiding them reduces confusion and visual clutter. Navigate to your home directory and type ls -a (the -a flag means “show all”). You will probably see hidden folders like .Trash and files like .zsh_history. You should cat the latter file and explore it: .zsh_history saves a record of some of the things you’ve recently typed into the terminal – it’s useful to check this file if you’ve done some work and forgotten the commands you used.
Create a new file in your home directory called .zshrc. This is a special file that zsh reads from and it alters its behavior. Remember in the Searching Within Files section where I taught you that --color=always is a useful argument to add to grep because it highlights matches? This argument is so useful that many programmers choose to make it default. .zshrc allows you to create aliases, or new functions, based on older ones. Add the line alias grep="grep --color=always" to .zshrc. What this is doing is saying that there should be a new function called grep which is defined to be grep plus our match-highlighter. You can add other aliases too: alias l="ls -a" means that when you type l into the terminal ls -a is actually executed.
To make the changes to your .zshrc actually take effect, either restart your terminal or run source ~/.zshrc.
Another reason why aliases are useful is for executing programs you’ve built. Let’s say you’ve written a Python program that prints an uplifting quote to your terminal called make_me_happy.py. You could make an alias that automatically runs this: alias happy="python3 /Users/cameron/pyfiles/make_me_happy.py. Then if you type happy into your terminal, a quote will automatically appear!
Odds and Ends
We’ve made a lot of progress in this section: learning how to make stuff, move around, search for things, chain together commands, and more! Now I’m going to wrap up some loose ends by introducing some more commands you might find useful.
wc invisible_cities.txt should produce the output: 2989 25802 147309 invisible_cities.txt. The first number is the count of lines, then words, then characters. If you want to only count words, use the flag -w. The flags -l and -c work for lines and characters, respectively.
curl is a command that simply takes the contents of something on the web, like a text file or HTML document, and prints it to your terminal. Try out curl https://raw.githubusercontent.com/camoverride/get_into_tech/master/chapter_1/invisible_cities.txt and see what happens. You can also redirect this to a file using the > operator. Take a look at the output from this command: curl https://camtsmith.com/articles/2016-08/strawberry-trees – this might be your first encounter with HTML!
sed (stream editor) is a program that replaces some text with some other text, accepting regular expressions as input. Here’s what its syntax looks like: sed "s/<thing_to_replace>/<what_to_replace_it_with>/<flag>", where the flag g means “replace stuff globally”. See the hilarious output when you replace all the vowels in Invisible Cities with uu: head invisible_cities.txt | sed "s/[aeiou]/uu/g".
Taking a Step Back
cd, grep, pwd, ls, mkdir, wc, curl, sed, etc. are all actually programs. They’re mostly written in a somewhat-antiquated language called C. These programs are the standard library of commands that techies use to get around their computer and do work. When you’re programming, it’s important to be familiar with this environment: it’s not enough to simply be able to write code – you need some context in which to run it!
In the last two sections of this chapter I’m going to introduce text editors and then give you a large zsh cheatsheet.
Text Editors
In Creating, Exploring, and Deleting Files I showed you how you can open a .txt file using the command open <file>.txt. This opens the file in TextEdit, the default editor on MacOS. There are better editors out there. Install VS Code by following the link here. This editor is convenient because it makes your code look pretty, shows you all the files in your working directory, and has other important utilities that you’ll come to appreciate once you begin coding. Once VS Code is installed, figure out how to run it from the command line (here).
Zsh cheat sheet
The Zsh shell is ultimately descended from the Unix Shell. Most of the commands are identical. If you want an excellent guide that will help fortify your Unix/Zsh knowledge, then check out Unix For Poets.
Below is a list of useful Zsh commands that were introduced in this chapter.
touch <file_name>creates a file.cp <source> <target>copies a source file to a specified destination.mkdir <directory_name>creates a directory. This can take multiple arguments.pwdprints the path to the current working directory.cd <directory>changes to the specified directory.cd ..changes to the parent directory.cat <file>prints the contents of a file to the terminal.lsprints the contents of the current directory. Equivalent tols ..ls <directory>prints the contents of a specified directory.head -<n> <file>prints the firstnlines of a file, default 10.tail -<n> <file>prints the lastnlines of a file, default 10.rm <file_or_directory>deletes a file or directory. The-rflag will need to be used for directories:rm -r <directory>. Can take multiple arguments.mv <source> <target>moves a file or directory. If the source and target are in the same folder, this functions as renaming the file.echo "<text>"prints everything followingechoto the terminal.grep <pattern> <file>searches for a given pattern within a file and prints any lines containing the pattern.grep -r <pattern> <directory>recursively searches through all files in the directory and prints lines matching the pattern.find <directory> -name <pattern>searches for a file named with a given pattern from the specified directory, e.g. to locate all word documents:find . -name *.docx.>writes to a file:echo hello world > hello.txt.>>appends to a file:echo line two! >> hello.txt.|passes the output of one command to another command as its input:cat -100 invisible_cities.txt | grep "Khan"
A Final Note
There’s a significant learning curve associated with using the command line. This means that a skilled GUI user will be faster than a novice command line user. However, a skilled command line user is much better off than a skilled GUI user, and there are many things that can be done in the terminal that aren’t even possible with the GUI. Getting comfortable with the command line is the first step to unlocking the true power of your computer, a power that might not even be fully obvious until you’ve started to code. This brings us to the next part…